Demonstration how to build a Management Web interface to interact with the FPGA fabric and change the FPGA configuration with the Django Framework

This step by step guide shows how to log Sensor Data from a Soft-IP ADC interface within a SQLite-Database and how to plot these data on a web interface. In addition, it is demonstrated how to manage and change the FPGA Configuration with just a web browser.
Complex web interfaces for controlling and monitoring on embedded systems are standard today. Especially for low quantity FPGA applications, the development of these web applications is often time-consuming. To accelerate this process, it is important to use powerful web development frameworks with simple to use IDEs such as Django. A huge community on desktop site uses that and if the same version of Django runs on the embedded Linux, it is possible to benefit from their knowledge. Django has a comprehensive documentation with many demos. However, these demos are for typical Desktop- and Cloud- applications and not for embedded ones. The important part of embedded management web applications is the interaction between the web interface and Sensor- or FPGA-data.
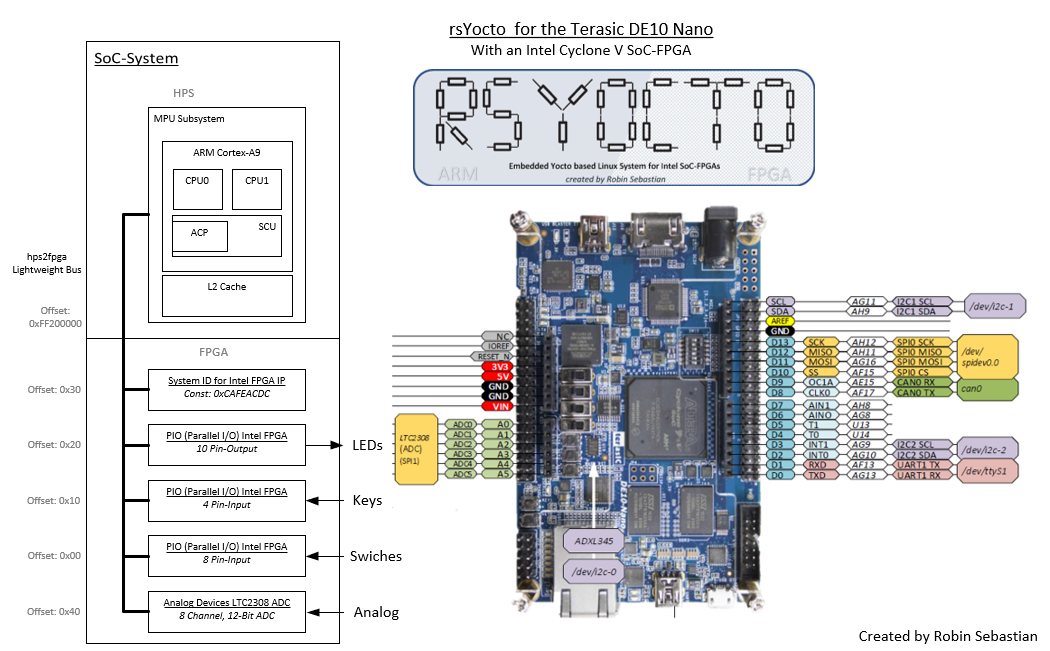
To demonstrate this, the ADC converter (Analog Devices LTC2308) of a Terasic DE10-Nano- or DE10-Standard Board (Intel Cyclon V SoC-FPGA) with a Soft-IP interface is connected via the Lightweight HPS to FPGA Bridge to the Hard Processor System (HPS).
On the ARM Cortex-A9 of the HPS my embedded Linux, called rsYocto, customized for Intel SoC-FPGA is running.
On rsYocto the Django Framework (Version 3.0.2) with all necessary components, like the Apache Webserver and the SQLite database, is pre-installed.
This approach is the monitoring and management of embedded FPGA systems with a web interface. This cannot be consider for low latency real-time applications.
The advantage of the usage of SQLite and HTTP with Linux is that these are standard in the desktop world. It allows for example to connect the data with a cloud service by adding a few extensions.

The following sequence Diagram shows all involved actors and the data flow by reading an ADC Value to a SQLite Database. If an user opens the web page, Django plots the complete data into the web interface as shown below.
A HTTP GET-command (here by calling the URL http://127.0.1:8181/ADCtrigger) triggers the Django web application. It calls the “read Sensor” application. This is a python script, which reads the Soft-IP ADC Interface and returns the ADC convention. Then Django adds the value with a time stamp to the SQLite database.
To repeat and time sync the readout of the ADC a Shell script or the tool crontab can be considered.
In case an user is going to open the web application, Django loads the complete data of the ADC from the database and plots them graphically into the webpage.
This is one part of the final application. The interface for managing FPGA Configurations works similarly.
For installing and testing the final project do the following steps:
git clone https://github.com/robseb/Django2FPGAdemo.git
cd DjangoFPGA/DjangoFPGA
python3 manage.py createsuperuser
bash
  django-admin startproject DjangoFPGA
Note: Use in the drop-down menu (blue arrow) the point “sh“ to access the Linux Terminal. In case the point is not there, press the “+”-icon to add it.
bash
cd DjangoFPGA2. After some change of the settings file a **migration** of the project is necessary:bash* The output of this command should look like this:bash3. Use the next command to **start the web server** (here on Port 8181)bash* The output of this command should look like this:bash* **Note:** The default port 8080 is used by the *Apache web server*
* Go with a web browser on a device inside this network (computer, tablet, smart-phone) to the URL:txt* If you see a *rocket lunch* your Django project works properly

* All **HTTP**-attaches are listed on the terminal as well
# Creating a new Django App to interact with the FPGA fabric
Every Django project requires at least one application (App). We will build an App to readout the Soft-IP ADC Interface (*Analog Devices LTC2308*) of a Terasic DE10-Standard- or Terasic DE10-Nano-Board and present the data in the web browser.
As a second feature, we will build a management interface for changing the FPGA configuration.
* The following command adds a new app called "*BoardInteraction*" to the project.bash* **Note:** Be sure that this command is executed inside the project-folder (*DjangoFPGA/*)
* The project folder contains the following structure now:
* All important files are marked

* Add this application to the Django project by adding the following line to the variable **INSTALLED_APPS** iniside *settings.py*:python* **Note:** This is a connection to the *main-function* *BoardinteractionConfig()* that is located in the *"app.py"* file
* **Migrate** the project againbash## Creating a model to store the Sensor data and FPGA configuration files into a SQLite database
* Add the following python code to the model file (*DjangoFPGA/BoardInteraction/models.py*)python## Creating an Administrator page to allow an access to the database
* Create an user who can do the login to the admin site. Run the following command:bash* Enter an Username, an Email-Address and a Passwortbash* Allow the Admin to access all database models by adding the following code lines to the Admin-file (*DjangoFPGA/BoardInteraction/admin.py*)python## Testing the Administrator page
* Save all open files
* To generate a SQLite database with these settings execude the following Linux Shell commands (*DjangoFPGA/*):bash* Start the Django Serverbash* Open the following URL with a web browser:txt* The Yocto Login Screen should appear:

* Use your login credentials to login

* Here are all created databases accessible
* At this point it is possible to add the sensor data manuelly
## Presenting the Sensor Data and FPGA configuration on a web page
* To view this data in a graphic the library [plotly](https://plot.ly/python/) is used
* That is an easy way to implement such kind of UI-elemets to a web page.
* In the same way it is possible to add any kind of diagramms to this web App (please follow the [official documentation](https://plot.ly/python/)
* To display something on a web page it is necessary to add some lines of code to the "*views.py*"-file (*DjangoFPGA/AccSensor/views.py*):python* For displaying the FPGA Configuration management interface extend the *views.py*-file with the following lines of python code
```python
#
# If the user select a FPGA Configuration file this function will be called
# to insert the file to the data base and the FPGA will be configured with it
#
def change_FPGAconfiguration(request):
# <URL>/?subjectID=<Configuration file path>
subjectID = request.GET.get("subjectID")
# Write this file on the FPGA fabric
call('FPGA-writeConfig -f '+settings.BASE_DIR+"/"+subjectID, shell=True)
# Relaod the main app page again
return HttpResponseRedirect(request.META.get('HTTP_REFERER', '/'))
#
# If the user select the rool back to the boot FPGA Configuration this function will be called
#
def change_FPGAconfigurationBack(request):
# <URL>/?subjectID=<Configuration file path>
subjectID = request.GET.get("subjectID")
# Write the FPGA fabric back to the boot state
call('FPGA-writeConfig -r', shell=True)
# Relaod the main app page again
return HttpResponseRedirect(request.META.get('HTTP_REFERER', '/'))
```
* These are two event functions, which are triggered in the case a FPGA-Configuration button was pressed
* To allow to collect and update the ADC Sensor data add the following function to the *"views.py"*-filepython* With these functions two events are declared, this allows to control the FPGA LED 0 with a push button:
* Add them to the "*views.py*"-file as wellpython* The *render*-function uses the "*DisplayTemplate.html*" HTML file to build the canvas of the web interface
* Django only looks for this kind of template file in this folder structure: *<App>/templates/<App>/*
* That meens, that this file must be located here:txt* Creat the file with all folders with *Visual Studio Code Insider*
* For building a simple UI add the following to the HTML file:html
{% autoescape off %}{{ plot_div }}{% endautoescape %}<br><!--Show the FPGA Configuration File upload box--><h3>Chnage the FPGA Configuration </h3><form action="{% url 'main' %}" method="post" enctype="multipart/form-data">{% csrf_token %}<p>{{ form.non_field_errors }}</p><p>{{ form.docfile.label_tag }} {{ form.docfile.help_text }}</p><p>{{ form.docfile.errors }}{{ form.docfile }}</p><p><input type="submit" value="Upload"/></p></form><!--Show a list of all stored FPGA configuration files--><br><h3>FPGA configuration manager </h3><h4>List of all saved FPGA configuration files</h4>{% if documents %}<ul><table border="1"><tr><th>File Name</th><th>Upload Date</th><th>Load to the FPGA fabric</th></tr>{% for document in documents %}<tr><td>{{document.docfile.name}}</td><td>{{document.timestamp}}</td><td><a href="{% url 'scriptFPGAconf' %}?subjectID={{document.docfile.url}}">Configure FPGA</a></td></tr>{% endfor %}<tr><td>Bootloader FPGA Configuration</td><td>-</td><td><a href="{% url 'BootloaderFPGAconf' %}">Roll back</a></td></tr></table></ul>{% else %}<p>No documents.</p>{% endif %}<!--Create two push buttons to control the FPGA LED 0--><br><h4>FPGA LED 0 Control </h4><button onclick="location.href='{% url 'scriptLED0N' %}'">LED 0 ON</button><button onclick="location.href='{% url 'scriptLED0F' %}'">LED 0 OFF</button></center></body></html>````
To show a File Upload box for the selecting of a FPGA configuration file these steps are requiered
Add the following code to this file
'''Django FPGA Interaction demo application - "form.py"'''from django import forms## Build the Upload File Box for selecting# a FPGA configuration file#class DocumentForm(forms.Form):docfile = forms.FileField(label='Select a ".rbf"- FPGA configuration file',help_text='Click Upload to save the file and configure the FPGA fabric')
To link the front page to the App, add the following lines of code to the global url configuration file (DjangoFPGA/DjangoFPGA/urls.py):
# DjangoFPGA URL Configurationfrom django.contrib import adminfrom django.urls import path# Include the "BoardInteraction" Appfrom BoardInteraction import views# URL linkages of this projecturlpatterns = [# UIpath('', views.detail,name="main"), # Front page -> linked to the "BoardInteraction" Apppath('admin/', admin.site.urls), # /admin -> Admin interface# HPS LED 0path('LED0_ON',views.LED0_ON,name="scriptLED0N"), # /LED0_ON -> triggered by pushing the LED0 ON Buttonpath('LED0_OFF',views.LED0_OFF,name="scriptLED0F"), # /LED0_OFF -> triggered by pushing the LED0 OFF Button# e.g. views.LED0_ON is the name of the viewer function# With e.g. the name="scriptLED0N" the linkage is taken to the HTML event handler: '{% url 'scriptLED0N' %}'# FPGA Configurationpath('FPGA',views.change_FPGAconfiguration,name="scriptFPGAconf"),path('BOOTFPGA',views.change_FPGAconfigurationBack,name="BootloaderFPGAconf"),# ADC Sensor Triggerpath('ADCtrigger',views.ADCtrigger,name="scriptADCtrigger")]
pip install plotly
python3 manage.py makemigrationspython3 manage.py migratepython3 manage.py migrate --run-syncdb
python3 manage.py runserver 0:8181
http://<iPv4-Address of the Board>:8181/admin
The front page should now look like this:

Test the Webinterface:
At this point the ADC plot is empty, because no application has written to the database. This will be solved in the next steps.
As it is shwon in the sequence diagram above the readout of the FPGA data is triggered by calling the URL http://127.0.1:8181/ADCtrigger. Then the web interface starts an application to collect the ADC sensor data into the database.
To implement that two extensions of the project are required:
A function handler, that calls this application and writes the received values to the database
from BoardInteraction.models import ADCSensorReading, ADCchannel
from django.conf import settings
#
#
def ReadADCchannel():
for sensor in ADCchannel.objects.all():
adc_u = 0# Start the Python Script "adcReadChannel.py" to read the ADC Channeltry:adc_u = float(subprocess.check_output(['python3',settings.BASE_DIR+'/BoardInteraction/adcReadChannel.py',str(sensor.ch)],stderr=subprocess.STDOUT, timeout=None))except ValueError:adc_u = 0subprocess.call('echo Value Error ', shell=True)# Write the value to the databaseADCSensorReading.reading = adc_unewreading = ADCSensorReading(reading= ADCSensorReading.reading)newreading.save()sensor.readings.add(newreading)sensor.save()
return True
2. An application to read an ADC Channel of the Soft-IP ADC interface* *service.py* will call the following python script to read the ADC````textDjango2FPGAdemo/DjangoFPGA/BoardInteraction/adcReadChannel.py
‘’’
@disc: Single Shoot ADC Channel readout (Analog Devices LTC2308)
Fast way over the virtual memory
@date: 21.01.2020
@device: Intel Cyclone V
@author: Robin Sebastian
(https://github.com/robseb)
‘’’
import os
import time
import math
import sys
#
import devmem
HPS_LW_ADRS_OFFSET = 0xFF200000
ADC_ADDRES_OFFSET = 0x40
ADC_CMD_REG_OFFSET = 0x0
ADC_DATA_REG_OFFSET = 0x4
### FIFO Convention Data Size for average calculationFIFO_SIZE = 255 # MAX=1024if __name__ == '__main__':# Read selected ADC Channel as input argument [1]# python3 adcReadChannl <CH>ch = 0ch_selet = str(sys.argv[1])try:ch = int(ch_selet)except ValueError:ch = 0if(not(ch >=0 and ch < 6)):ch = 0# open the memory Access to the Lightweight HPS-to-FPGA bridge# (Base address, byte length to acceses, interface)de = devmem.DevMem(HPS_LW_ADRS_OFFSET, ADC_ADDRES_OFFSET+0x8, "/dev/mem")# Set FIFO size for ADC value averagingde.write(ADC_ADDRES_OFFSET+ADC_DATA_REG_OFFSET,[FIFO_SIZE])# Enable the convention with the selected Channelde.write(ADC_ADDRES_OFFSET+ADC_CMD_REG_OFFSET, [(ch <<1) | 0x00])de.write(ADC_ADDRES_OFFSET+ADC_CMD_REG_OFFSET, [(ch <<1) | 0x01])de.write(ADC_ADDRES_OFFSET+ADC_CMD_REG_OFFSET, [(ch <<1) | 0x00])timeout = 300 #ms# Wait until convention is done or a timeout occurredwhile (not(timeout == 0)):if(de.read(ADC_ADDRES_OFFSET+ADC_CMD_REG_OFFSET,1)[0] & (1<<0)):breaktimeout = timeout -1time.sleep(.001) # delay 1ms# calculate the average of the FIFOrawValue = 0for i in range(FIFO_SIZE):rawValue = rawValue+ (de.read(ADC_ADDRES_OFFSET+ADC_DATA_REG_OFFSET,1))[0]value = rawValue / FIFO_SIZE# Convert ADC Value to Volagevolage = round(value/1000,2)# print the Valueprint(str(volage))````
This Django application needs a new database entry for all ADC Channels to read.
This will be stored inside the database “ADCchannel“. This is only possible by hand as an Admin with the admin interface.
Start the Django Server
python3 manage.py runserver 0:8181
http://<iPv4-Address of the Board>:8181/admin


At this point only one ADC Value is inside the plot. To manually read the ADC channel it is possible to open
http://<iPv4-Address of the Board>:8181/
Then reload the application page. The new collected value is plotted now too.
http://<iPv4-Address of the Board>:8181/ADCtrigger
To automatically read the ADC Channel in a time interval are two approaches shown here
Usage of a shell script
for nvar in {1..500}
do
curl -s http://127.0.0.1:8181/ADCtrigger
sleep 0.1
done
echo “*“
````
crontab
sudo nano /etc/crontab`
Django2FPGAdemo and rsyocto are self-developed projects in which no other companies are involved.
It is specifically designed to serve students and the Linux/FPGA open-source community with its publication on GitHub and its open-source MIT license.
In the future, rsyocto will retain its open-source status and it will be further developed.
Due to the enthusiasm of commercial users, special features for industrial, scientific and automotive applications
were developed and ready for the implementation in a highly optimazed closed commercial version.
Partnerships as an embedded SoC-FPGA design service to fulfil these specific commercial requirements are offered.
It should help, besides students with the rsyocto open-source version, commercial users, as well.
For commercial users, please visit the rsyocto embedded service provider website:
rsyocto.com

![]()


