C++ trainable detection library based on libtorch (or pytorch c++). Yolov4 tiny provided now.
Visit Libtorch Tutorials Project if you want to know more about Libtorch Detection library.
Download the VOC image dataset, and split the dataset into train and val parts as follows:
dataset├── train│ ├── images| | ├──xxx.jpg| | └......│ ├── labels| | ├──xxx.xml| | └......├── val│ ├── images| | ├──zzz.jpg| | └......│ ├── labels| | ├──zzz.xml| | └......
Download the yolo4_tiny pretrained weight here. And load it into your cpp project as follows:
Detector detector;detector.Initialize(-1, /*gpu id, -1 for cpu*/416, /*resize width*/416, /*resize height*/"your path to class name.txt");detector.Train("your path to dataset dir",".jpg", /*image type*/30,/*training epochs*/4, /*batch size*/0.001, /*learning rate*/"path to save detector.pt","path to load pretrained yolo4_tiny.pt");
Predicting test. A detector.pt file is provided in the project here (trained on VOC for one epoch, just for testing…). Click and download, then you can directly test the detection result through:
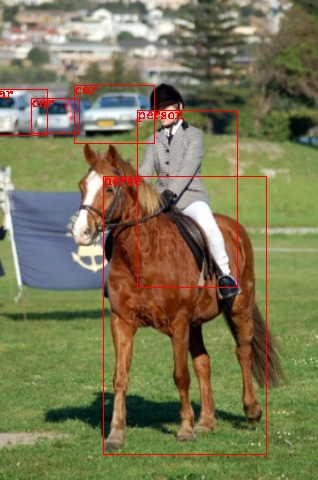
cv::Mat image = cv::imread("your path to 2007_005331.jpg");Detector detector;detector.Initialize(0, 416, 416, "your path to voc_classes.txt");detector.LoadWeight("detector.pt"/*the saved .pt path*/);detector.Predict(image, true,/*show result or not*/, 0.1, /*confidence thresh*/, 0.3/*nms thresh*/);
the predicted result shows as follow:
Create your own dataset. Using labelImg through “pip install” and label your images. Split the output xml files and images into folders just like the example above.
Training or testing. Just like the example of VOC detection, replace with your own dataset path.
Dependency:
Windows:
Configure the environment for libtorch development. Visual studio and Qt Creator are verified for libtorch1.7+.
Linux && MacOS:
Install libtorch and opencv.
For libtorch, follow the official pytorch c++ tutorials here.
For opencv, follow the official opencv install steps here.
If you have already configured them both, congratulations!!! Download the pretrained weight here and a demo .pt file here into weights. Then just do the following:
export Torch_DIR='/path/to/libtorch'cd buildcmake ..make./LibtorchDetection
This project is under developing. By now, these projects helps a lot.
@misc{Chunyu:2021,Author = {Chunyu Dong},Title = {Libtorch Detection},Year = {2021},Publisher = {GitHub},Journal = {GitHub repository},Howpublished = {\url{https://github.com/AllentDan/LibtorchDetection}}}
Project is distributed under MIT License.
Based on libtorch, I released following repositories:
Last but not least, don’t forget your star…
Feel free to commit issues or pull requests, contributors wanted.