pretrained yolov3 , real time detection
You only look once (YOLO) is a state-of-the-art, real-time object detection system.
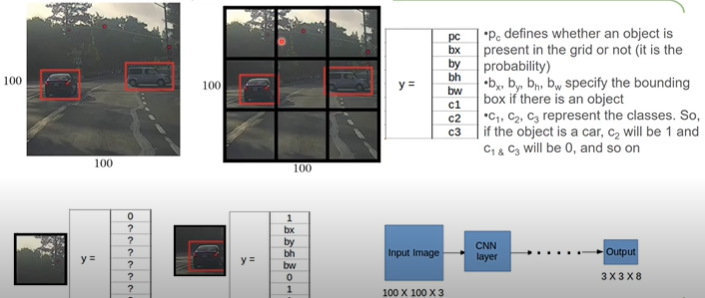
YOLO is a clever convolutional neural network (CNN) for doing object detection in real-time. The algorithm applies a single neural network to the full image, and then divides the image into regions and predicts bounding boxes and probabilities for each region. These bounding boxes are weighted by the predicted probabilities.
Yolo website : https://pjreddie.com/darknet/yolo/
How It Works:
Prior detection systems repurpose classifiers or localizers to perform detection. They apply the model to an image at multiple locations and scales. High scoring regions of the image are considered detections.
Yolo use a totally different approach. it applies a single neural network to the full image. This network divides the image into regions and predicts bounding boxes and probabilities for each region. These bounding boxes are weighted by the predicted probabilities.
What i have done ?
in this notebook i have used one of the easiest method to implement the Yolo v3 model since it does not require an installations other than opencv . I have used the configuration architectur and weights files provided by the author on the darknet website.
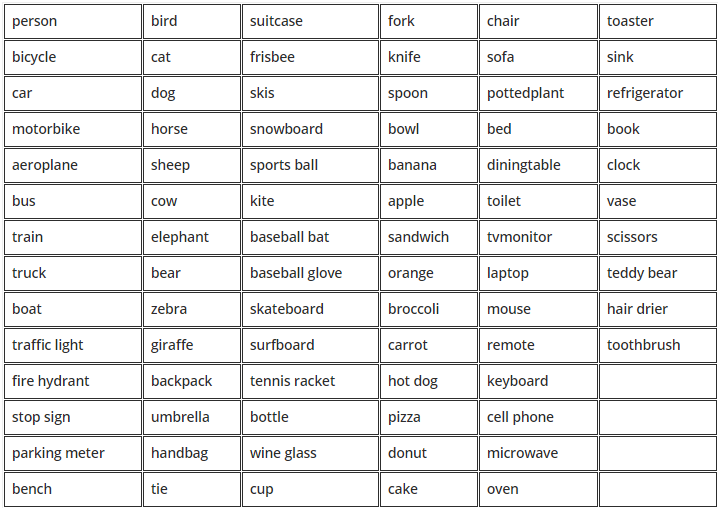
First i will load the yolo3 model. Since it was trained on the coco dateset i will first collect the names of our classes. This can be imported from the coco.names file.
Any model has two main components. One is the Architecture and the other is weights. For yolo3 we have separate files for both. So we will import the configuration file that has the architecture and the weights file that contains the weights.
On the Yolo website we can find different cfg and weight files.I think 320 is the best trade off between speed and accuracy.
we can load our model using the readNetFromDarkNet function. We will also set the backend to openCV and the target to CPU.
We cannot send our image form the camera directly to the network. It has to be in a certain format called blob. We can use the blobFromImage function which creates 4-dimensional blob from image. Optionally resizes and crops image from center, subtract mean values, scales values by scalefactor, swap Blue and Red channels. I will keep all the values at default.
Now based on which image size we used when we downloaded the cfg and weight files, we will set the size of the image. Since we used 320 we will set our whT (widthHeightTarget) parameter to 320.
Since the Yolo3 Architecture has 3 output layers we have to find their names so we can get their outputs.
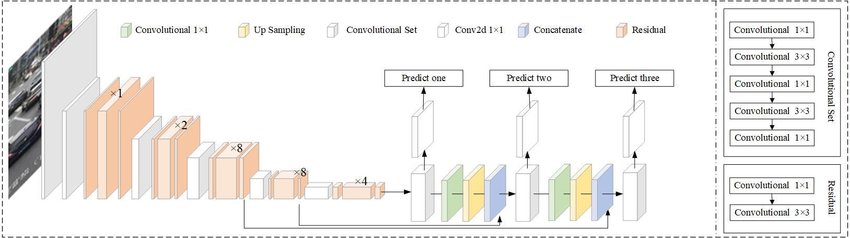
To get the names we can use the getLayerNames fucnction. This returns all the names, but what we need are the names of only the output layers. So we can use the getUnconnectedOutLayers function which returns the indices of the output layers. Now we can simply use these indices to find the names from our layersNames list. Since we use 0 as the first element we have to subtract 1 from the indices we get form the getUnconnectedOutLayers function.
This will return us a list of 3 arrays of the following size
300 x 85
1200 x 85
4800 x 85
Here the 300, 1200, and the 4800 are the number of boxes we get from the respective output layers. But what is the value of 85? If you have to define a box you can simply define it with the center position cx,cy and the diagonal corner w,h. This means we only need 4 values ( cx,cy,w,h), so our arrays should be 300×4, 1200×4, and 4800×4 .Then what are the rest of 81 values?
The fifth value is the confidence which tells us how likely is it that we have an object in this box. The rest of the 80 values correspond to each class confidence. So if there was a car in the image then, 5 + 3 = 8th element would show a high confidence value e.g. 0.7 (car is the 3rd element in the list of coco names).
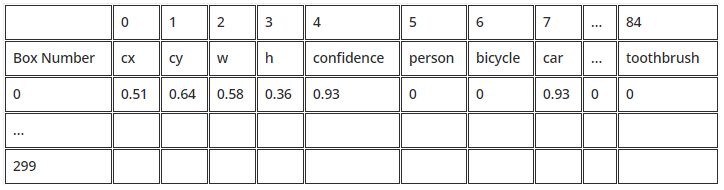
The cx,cy,w,h values are in percentage format. This means to get the pixel values we simply multiply it with the width and the height of our image.
So now that we have the arrays that contains all the information of the boxes, we can filter out the low confidence ones and create a list of relevant boxes that contain objects. We will create a new function by the name findObjects.
To Store the information of the relevant boxes we will create 3 lists. One would contain the information of the bounding box corner points, the other of class id with the highest confidence and last one with the confidence value of the highest class.
Now we will loop through the 3 outputs and get the boxes one by one. We will call each box det, short for detection, since it contains more info than just the coordinates of the box.
As we know that each detection/box contains 85 values of which first 4 are cx,cy,w,h,Confidence and the rest 80 are class confidence values, we will remove the first 5 values from the detection. This will allow us to find the class index with the highest confidence values.
Not that we have the confidence value we can filter it. So we will add the confidence threshold. So if the confidence is grater than this, then only it will qualify as an object detected. Then we can get the pixel values of the x,y,w,h. To get pixel value we can simply multiply it with the width and height respectively. Note that we will use x,y which is the origin rather than cx,cy which is the center point. Lastly we will append the values to the corresponding lists.
Yolo uses NMS to only keeps the best bounding boxex.
At this point we can pretty much draw the bounding boxes and call it a day. But sometimes what happens is that more than one box points to the same object. In this case, instead of one detection we would have 2 detections, even though in reality we just have one object. An example of this is shown below.
To counter this problem we will use the Non Max Suppression. In the simplest term the NMS eliminates the overlapping boxes. It finds the overlapping boxes and then based on their confidence it will pick the max confidence box and supress all the non max boxes. So we will use the builtin NMSBoxes function. We have to input the bounding box points, their confidence values , the confidence threshold and the nmsThreshold. The function returns the indices after elimination.
Now that we have every thing sorted out we can simply draw the bounding boxes and display the object names and confidence values.