A python program for hand detection and finger counting using OpenCV library.
This is a project made with Python and OpenCV library.
For a better and visual understanding of this project and it’s concepts, watch the video in Youtube or click on the image-link below.
Below there are some instructions and information about the most significant parts of this project.
Define a smaller window (test_window) inside the main frame which will be the ROI (Region of Interest).
Only inside this window the tests will be visible.
# Define the Region Of Interest (ROI) windowtop_left = (245, 50)bottom_right = (580, 395)cv2.rectangle(frame, (top_left[0]-5, top_left[1]-5), (bottom_right[0]+5, bottom_right[1]+5), (0,255,255), 3)

# Frame shape : height and widthh, w = frame.shape[:2] # h, w = 480, 640
Focuse only to user’s hand. So in this part the hand must be isolated from the background.
Apply Gaussian Blur on the ROI.
test_window_blurred = cv2.GaussianBlur(test_window, (5,5), 0)
The window is in BGR format by default. Convert it to HSV format.
# Convert ROI only to HSV formathsv = cv2.cvtColor(test_window_blurred, cv2.COLOR_BGR2HSV)
In order to find user’s skin color (array values), user can modify the trackbars until the hand is the only thing that is visible. To enable trackbars window someone must define it before starting the program. So after importing the necessary packages add this part of code :
def nothing(x):passcv2.namedWindow("trackbars")cv2.createTrackbar("Lower-H", "trackbars", 0, 179, nothing)cv2.createTrackbar("Lower-S", "trackbars", 0, 255, nothing)cv2.createTrackbar("Lower-V", "trackbars", 0, 255, nothing)cv2.createTrackbar("Upper-H", "trackbars", 179, 179, nothing)cv2.createTrackbar("Upper-S", "trackbars", 255, 255, nothing)cv2.createTrackbar("Upper-V", "trackbars", 255, 255, nothing)
After that is time to define a range for the colors, based on arrays.
# Find finger (skin) color using trackbarslow_h = cv2.getTrackbarPos("Lower-H", "trackbars")low_s = cv2.getTrackbarPos("Lower-S", "trackbars")low_v = cv2.getTrackbarPos("Lower-V", "trackbars")up_h = cv2.getTrackbarPos("Upper-H", "trackbars")up_s = cv2.getTrackbarPos("Upper-S", "trackbars")up_v = cv2.getTrackbarPos("Upper-V", "trackbars")# Create a range for the colors (skin color)lower_color = np.array([low_h, low_s, low_v])upper_color = np.array([up_h, up_s, up_v])
Finally get the mask.
# Create a maskmask = cv2.inRange(hsv, lower_color, upper_color)cv2.imshow("Mask", mask) # Show mask frame

For each frame on the video capture, find the maximum contour inside the ROI.
if len(contours) > 0:# Find the maximum contour each time (on each frame)# --Max Contour--max_contour = max(contours, key=cv2.contourArea)# Draw maximum contour (blue color)cv2.drawContours(test_window, max_contour, -1, (255,0,0), 3)


# Find the convex hull "around" the max_contour# --Convex Hull--convhull = cv2.convexHull(max_contour, returnPoints = True)# Draw convex hull (red color)cv2.drawContours(test_window, [convhull], -1, (0,0,255), 3, 2)


This is the highest point of the convex hull.
min_y = h # Set the minimum y-value equal to frame's height valuefinal_point = (w, h)for i in range(len(convhull)):point = (convhull[i][0][0], convhull[i][0][1])if point[1] < min_y:min_y = point[1]final_point = point# Draw a circle (black color) to the point with the minimum y-valuecv2.circle(test_window, final_point, 5, (0,0,0), 2)


The center of max contour is defined by the point (cx, cy) using cv2.moments().
M = cv2.moments(max_contour) # Moments# Find the center of the max contourif M["m00"]!=0:cX = int(M["m10"] / M["m00"])cY = int(M["m01"] / M["m00"])# Draw circle (red color) in the center of max contourcv2.circle(test_window, (cX, cY), 6, (0,0,255), 3)


Find and draw the polygon that is defined by the contour.
# --Contour Polygon--contour_poly = cv2.approxPolyDP(max_contour, 0.01*cv2.arcLength(max_contour,True), True)# Draw contour polygon (white color)cv2.fillPoly(test_window, [max_contour], text_color)


The result of the command
defects = cv2.convexityDefects(contour_poly, hull)
is an array where each row contains the values:
Then find these points plus the mid points on each frame as below.
points = []for i in range(defects.shape[0]): # Len of arraysstart_index, end_index, far_pt_index, fix_dept = defects[i][0]start_pts = tuple(contour_poly[start_index][0])end_pts = tuple(contour_poly[end_index][0])far_pts = tuple(contour_poly[far_pt_index][0])mid_pts = (int((start_pts[0]+end_pts[0])/2), int((start_pts[1]+end_pts[1])/2))points.append(mid_pts)#--Start Points-- (yellow color)cv2.circle(test_window, start_pts, 2, (0,255,255), 2)


#--End Points-- (black color)cv2.circle(test_window, end_pts, 2, (0,0,0), 2)


#--Far Points-- (white color)cv2.circle(test_window, far_pts, 2, text_color, 2)


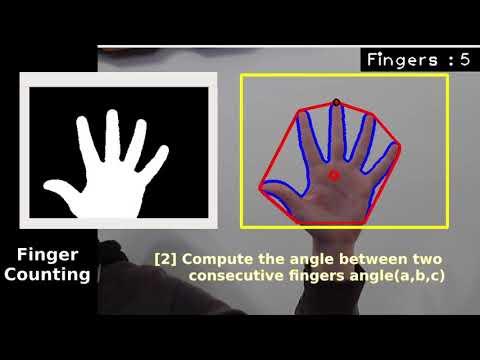
In order to do the finger counting we should find a way to check how many fingers are displayed. To do this we are calculating the angle between start point, defect point and end point as shown below.

# --Calculate distances--# If p1 = (x1, y1) and p2 = (x2, y2) are two points, then the distance between them is# Dist : sqrt[(x2-x1)^2 + (y2-y1)^2]# Distance between the start and the end defect pointa = math.sqrt((end_pts[0] - start_pts[0])**2 + (end_pts[1] - start_pts[1])**2)# Distance between the farthest (defect) point and the start pointb = math.sqrt((far_pts[0] - start_pts[0])**2 + (far_pts[1] - start_pts[1])**2)# Distance between the farthest (defect) point and the end pointc = math.sqrt((end_pts[0] - far_pts[0])**2 + (end_pts[1] - far_pts[1])**2)angle = math.acos((b**2 + c**2 - a**2) / (2*b*c)) # Find each angle# If angle > 90 then the farthest point is "outside the area of fingers"if angle <= 90:count += 1frame[0:40, w-40:w] = (0)
for c in range(5):if count == c:cv2.putText(frame, str(count+1), (w-35,30), font, 2, text_color, 2)if len(points) <= 1 :frame[0:40, w-40:w] = (0)cv2.putText(frame, "1", (w-35,30), font, 2, text_color, 2)
This project is aiming on understanding topics such as contours, convex hull, contour polygon. Also it focuses on the defect points which we are finding on the detected hand.
For a better and visual understanding of this project and it’s concepts, watch the video : video.