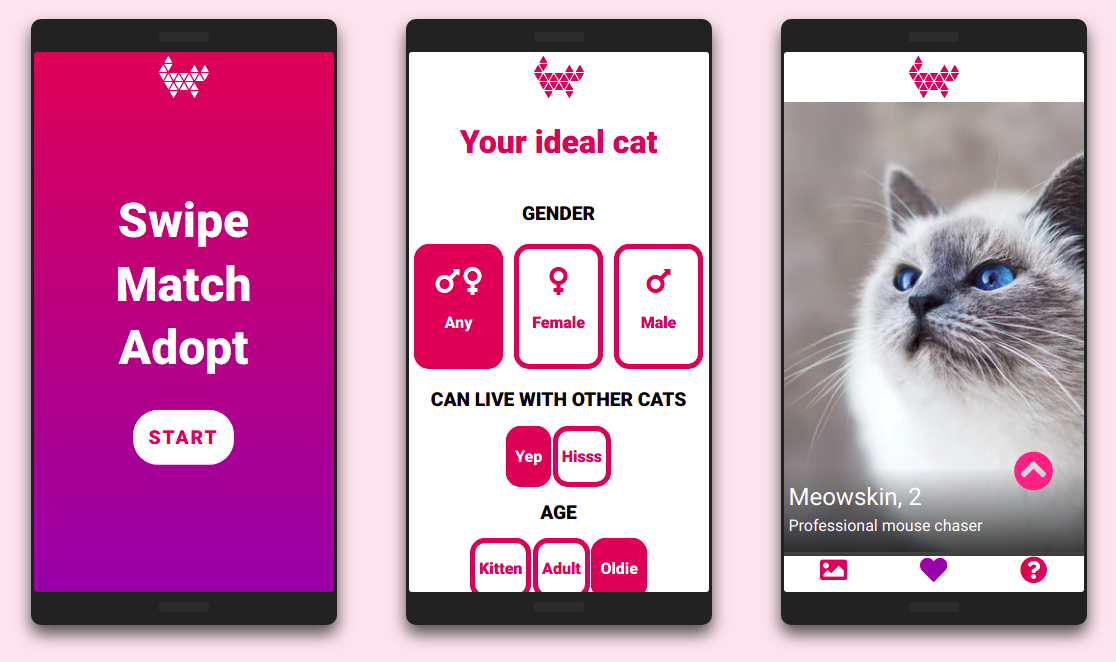
😻 CaTinder - adoption SPA
Let’s try and build a Tinder inspired SPA with React!
The idea might sound a tad scandalous but there are only good intentions behind it I assure you. If you don’t care for all the fluff just skip to the next paragraph. Still with me? Right. I used to work for an animal home admining their website and one of the most needed UX features were filters. Other than the picture and name of a cat or dog you got no other information unless you’ve clicked to see their profile at which point you had to realise they will definitely not get on well with your current overlord or best friend. Fun! But hey, at least it was great for creating long sessions and lots of clicks and those were the things the Head of Marketing and Communications were interested in. Me, I wanted to make our visitors’ lives a bit easier. This little app idea is a culmination of all the UX stuff on my wishlist spiced up with a little fun element. Funnily enough, the MVP does not have any filters…priorities.
Prototype of sorts…Only I am making a primarily desktop app. Why you ask? Well, I have not the first clue about React Native. To be fair, I don’t have much clue about React either and yet this is a React app. So…stay tuned?
I drew up the complete project with required components and functionalities needed. The optimist in me said just go for it. The realist decided to draw up an MVP version with a couple of components taken out and some functions dumbed down or excluded.
Looked like it was quite doable in a few days. Until…
I thought I got React Router…turns out, not so much.
From the opening page you should be taken to a random cat when clicking ‘Start’. I got a little perplexed. Nothing I’ve tried with <Route to> etc. worked, and I kept breaking the <Link>. To be fair, it was very late at night and my brain was having one of those ‘toddler tantrum’ times when it refuses to put in any effort until I treat it with a little YouTube, but that was not going to happen.
Now, on Day 2, with fresh eyes I have an inkling the answer lies with history.push
Read the Docs and learn the ins and outs of React Router. Or at least find the exact solution I need.
getFirstCat = () => {const firstCat = this.state.cats[0].name.toLowerCase();this.props.history.push(`/cats/${firstCat}`);};
I did not really read any of the docs in the end 
It’s DONE!

Well, the MVP at least. I’ll probably spend the next day hooking up the repo with Netlify and learning how to automate the process. Then it’s time to iron out some kinks and start adding more features.
But I’m calling it quits for today. It’s Saturday, I didn’t have much time to fiddle with this but my brain is already protesting (I’ve just spent 30 minutes debugging a simple if statement).
 Netlify continous deployment
From now on, everytime I push to master on Github Netlify will build and deploy the app. Magic! 
There was a tiny bit of fumbling about as I wasn’t sure how to put the _redirects file - essentially due to the use of React Router - in the automatically built build folder. First option was to create a netlify.toml file with all the build scripts but that looked a bit too much for just one file with one line of content. Thankfully, I’ve found the Netlify Playground where I’ve realised that I could just put a script in package.json and then provide netlify with the command chain of npm run build && npm run copy-redirects
All done…after about five failed builds thanks to the fact that I forgot to change the destination folder for redirects 
Custom domain with Netlify DNS
At this point I was on a roll and decided to go for the custom domain option. I bought a domain name a few weeks ago (only to use it as a custom email address, because vanity, that’s why). Netlify made the process super fast and super easy and within five minutes - only because it has been a while I have worked with domain settings - I was all set up.
Spent some time researching Sass use in CRA and styling best practices. Went back and forth between: use it, don’t use it.
Decision: use it. Went with CRA’s recommended setup from the documentation.
Now that I’ve done banging my head against the table and start to find my last hour of suffering hilarious I might as well share with you how much of an idiot/beginner I am.
I wanted a nice and neat folder structure for my css and scss files. So I ran npm start and then started fiddling with the scripts for build-css and watch-css…yeah, well, lesson learned: restart your app once you make a change in your scripts.