This repository contains the source code of House Monitor Smart Home IoT System developed by Xiaozheng and Xiaofei. This is also the Master's project of Xiaozheng and Xiaofei. JavaDoc:
update April 16, 2018
This repository contains the source code of a smart home sensor network system House Monitor. This is also the Master’s project of Xiaozheng(Will) Guo and Xiaofei(Elfie) Guo.
If you have any questions or advice, please feel free to contact us:
Email:
Will: xguo.tufts@gmail.com
Elfie: elfiegxf@gmail.com
This project is a full-stack project that can communicate with sensor networks using CoAP protocol. It can collect environmental data sets from sensors and store them in database. The back-end part provides a set of RESTful API that are easy to program with. Other developers can use this set of API in their Android, IOS or Web applications. See JavaDoc for more information.
Also, the project has a front-end part that communicates with the back-end part via RESTful API. The front-end pages allow users to set up the application and monitor data from a visual interface in their browser.
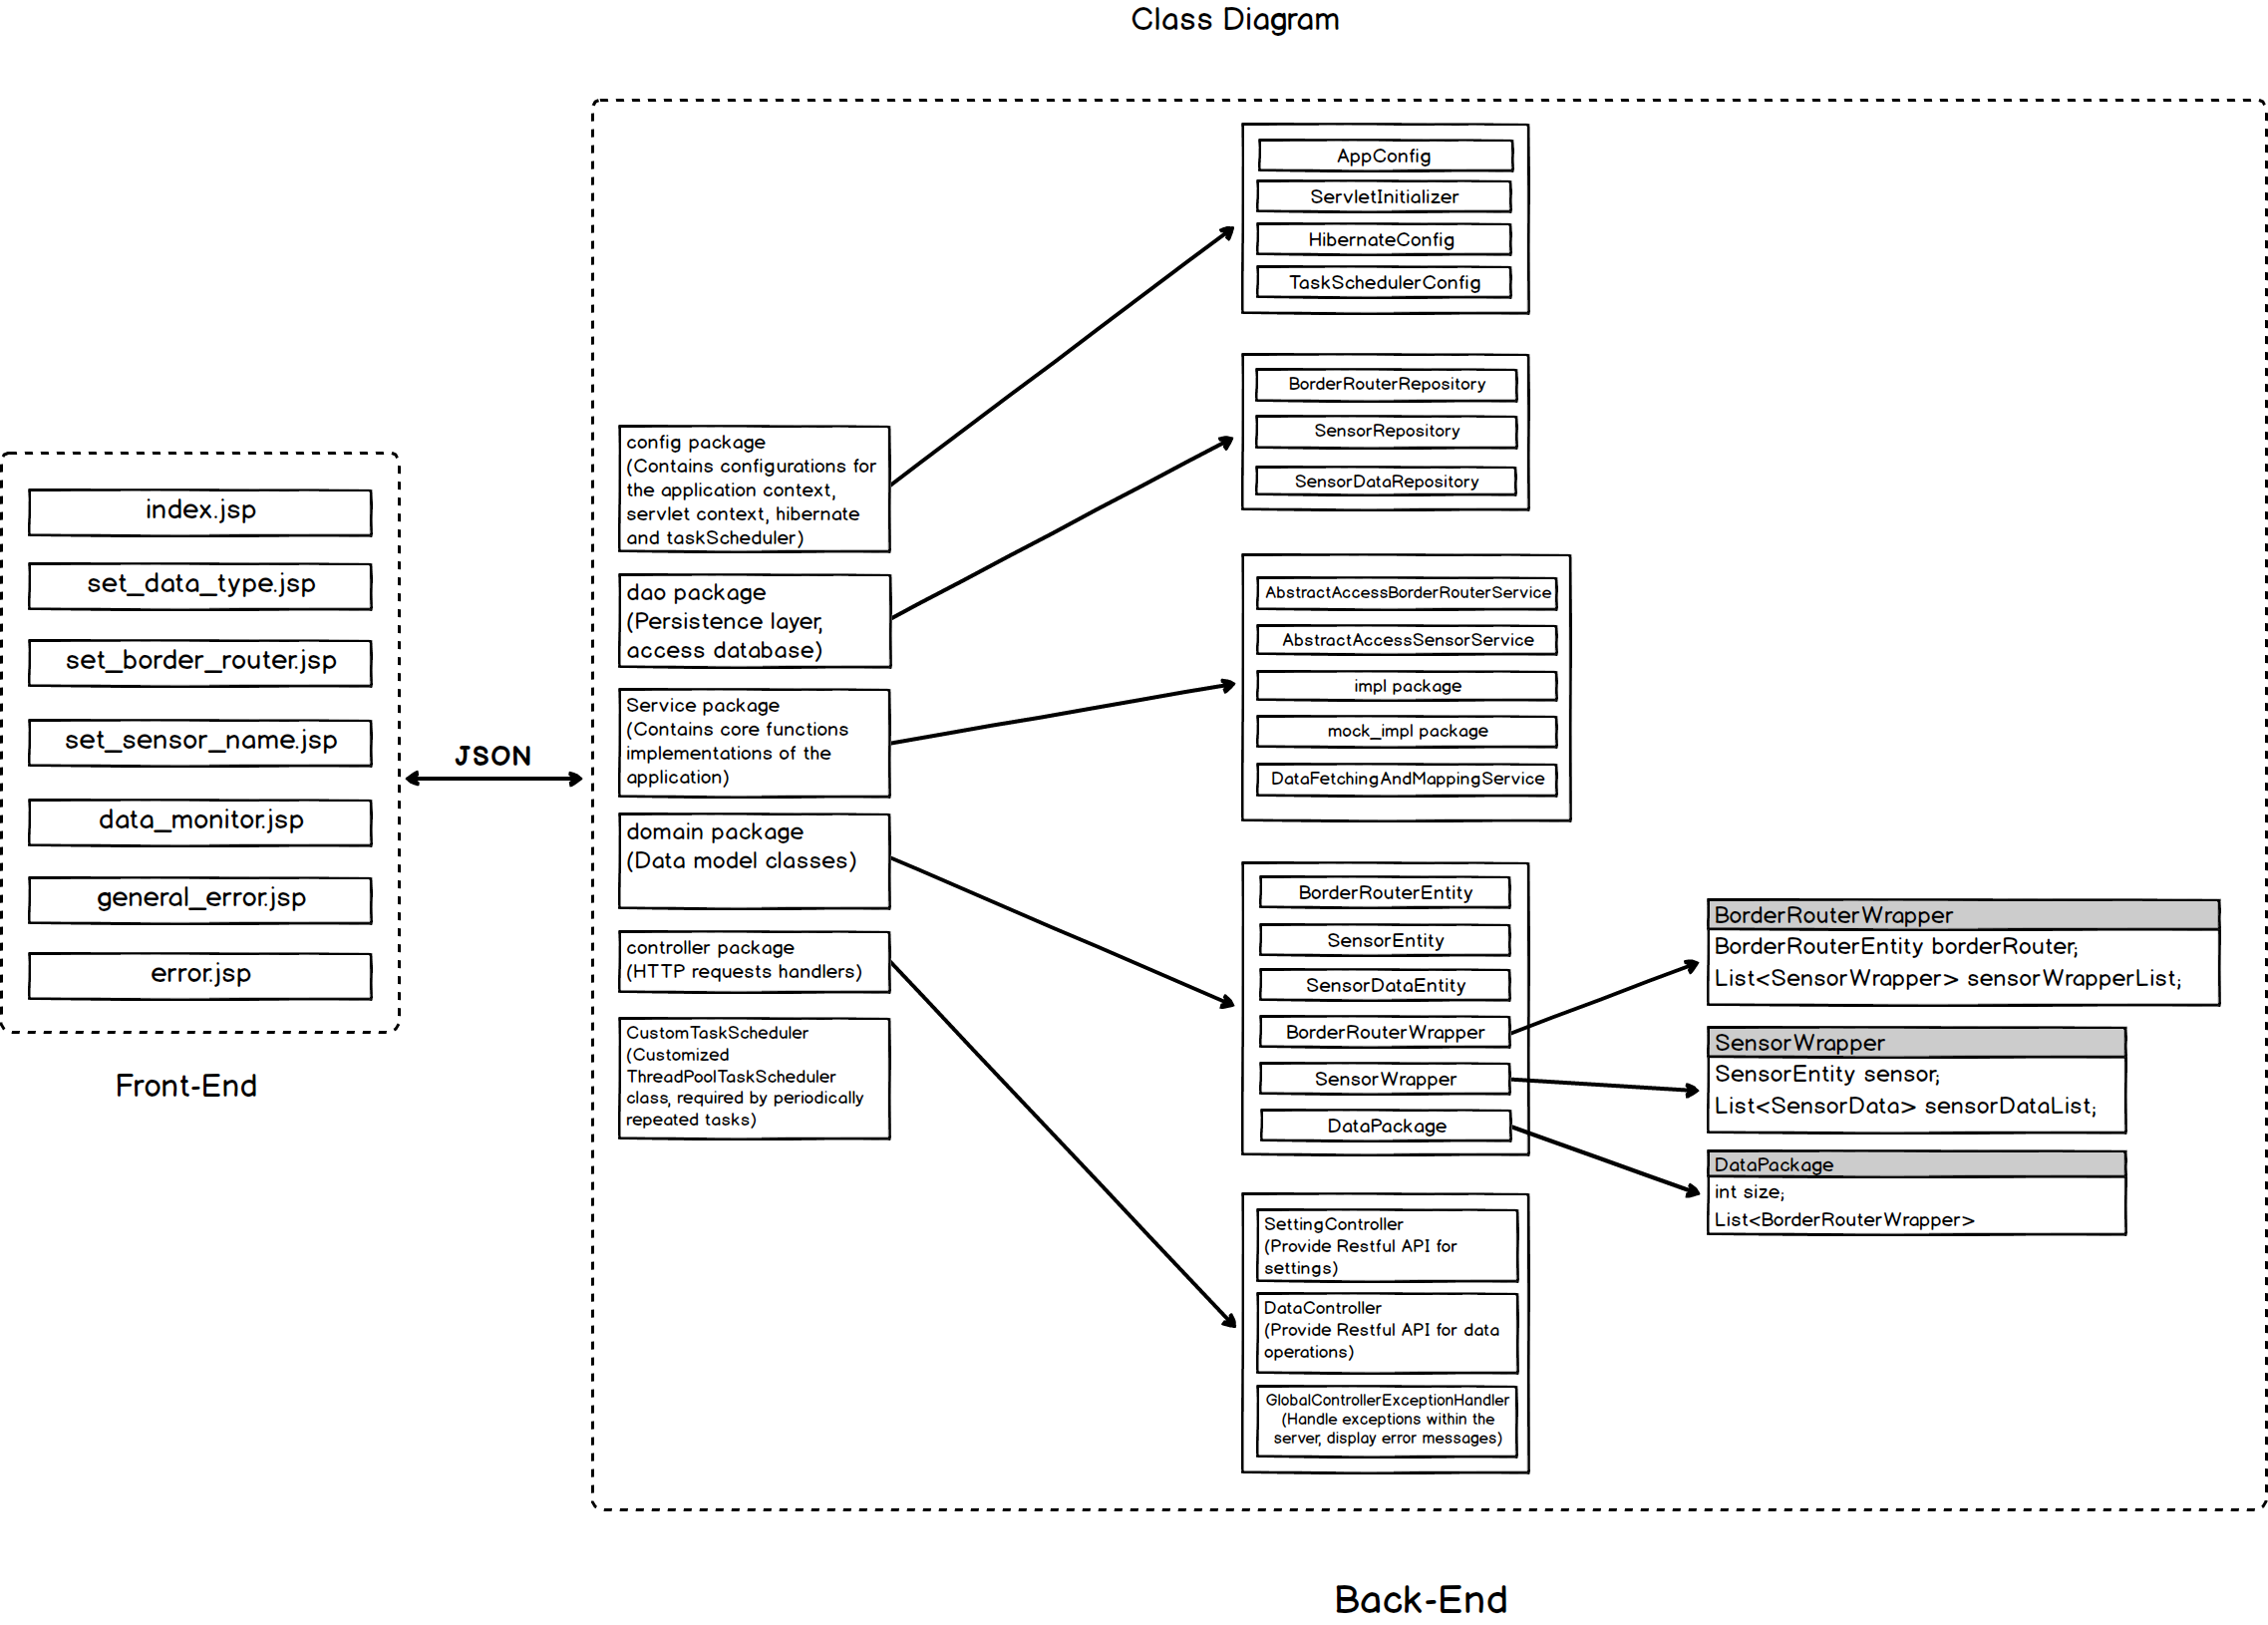
This part gives an overview of basic structure of the whole project. The project can be divided into two parts, front-end and back-end.
The front-end part contains all .jsp pages, which is developed with BootStrap, JavaScript and JSTL. The front-end part provides a visual interface for users to configure the system and monitor data from sensors. These .jsp files are located in src/main/webapp/WEB-INF/jsp folder, so they are not directly visible to public. Therefore, they need jspViewResolver and PageController to map specific URL patterns to them.
The back-end part contains all the core logic of the project. It gives front-end working functionality including the communication with sensor network, storing and fetching data from database and the management of front-end page flow. In this project, we chose JAVA back-end tech stack (JAVA, Spring MVC, Hibernate) to build the back-end part.
The picture below is the structure diagram of the project:
In this part, we will cover all the components and their relationships in the project. We will first introduce the file structure of the project, and then talk about each component in back-end and front-end.
The picture below is the file structure of the project:
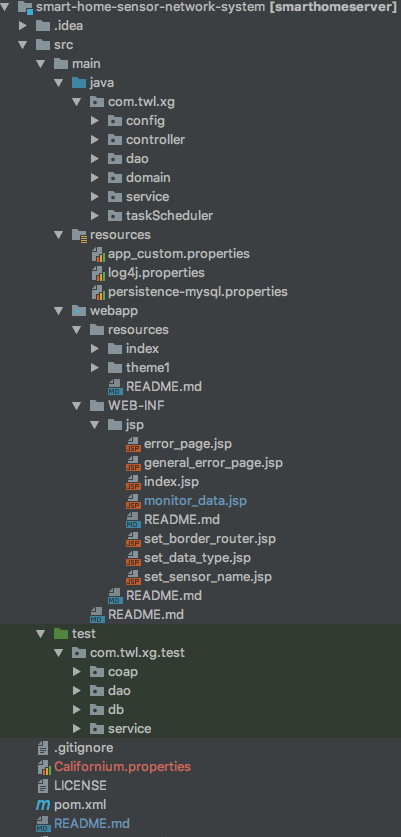
src: Contains all the source code and resources of the project;src/main: Contains all the source code and resources except for test code;src/main/java: Contains all the JAVA source code;src/main/resources: Contains resources needed by the back-end part, in this case this folder stores all the spring .properties configuration files;src/main/webapp: This is the web application resource folder, contains static resources and .jsp files of the front-end part;/src/main/webapp/resources: Contains all the static resources including .js, .css files and imgages;/src/main/webapp/WEB-INF: Contains all things that aren’t in the document root of the application. These files cannot be served directly to a client by the container, but they are visible to servlet code;/src/main/webapp/WEN-INF/jsp: Contains all .jsp files. Implement all front-end visual interface here;src/test: Contains all the unit test code.pom.xml: This POM file contains information about the project and configuration details used by Maven to build the project;We use MySQL database to store border router, sensor and data sets in disk. The picture below is the ER diagram of our design:

config packageServletInitializer classThis is a ServletInitializer class, Servlet3.0+ container (tomcat here) will pick up this class and run it automatically. This is the replacement for web.xml.
AppConfig classUsing this class to customize Spring MVC configuration. Notice that in Spring 4, we need to extend WebMvcConfigurerAdapter to do this, but since we are using Spring 5, which supports Java 8, the empty implementations of configuration methods has been moved to WebMvcConfigurer interface, we just need to implement this interface. Also, we register the dataTypeList bean to context in this class.
HibernateConfig classConfigure Hibernate framework and spring transaction manager in this class.
TaskSchedulerConfig classThis class set up the task scheduler for the application. This is needed for scheduled tasks.
controller packageSettingController classAll setting requests including customizing data types and turning on or turning off the periodically data fetching task are handled by this controller.
DataController classThis Controller handles all requests that are fetching sensor data from back-end. This is a restful controller, consume JSON, produce JSON.
PageController classThis is the general error page of the application. This function also takes an optional parameter “stackTrace”, which is the stack trace of the error.
GlobalControllerExceptionHandler classConfigure the global default exception handler.
dao packageBorderRouterRepository classpersistence layer class for BorderRouterEntity. Defines basic database operation methods for border router entity.
SensorRepository classPersistence layer for sensor entity, defines basic operations in database.
SensorDataRepository classThis is the repository class for sensor data entity. This class defines basic database operations for sensor data entity.
PropertyRepository classThis is the persistence layer class of PropertyEntity. Defines some basic operations on database.
domain packagePropertyEntity classThis is a POJO model that map to “custom_setting” table in database.
BorderRouterEntity classObject model for border router.
SensorEntity classObject model for sensor.
SensorDataEntity classObject model for sensor data.
DataPackage classThis is the wrapper class for the whole sensor data package. The sensor data in response body for the request is generated by converting this object to JSON.
BorderRouterWrapper classUse this class as the JSON model for borderRouter, an instance of BorderRouterWrapper contains an instance of BorderRouterEntity and a list of SensorWrapper.
SensorWrapper classUse this class as a JSON model, an instance of SensorWrapper contains an SensorEntity and a list of SensorDataEntity.
service packageimpl packageAccessBorderRouterService classReal implementation of getSensorIpByBorderRouterIp() and existBorderRouter(). Because of some technical reasons, we cannot provide a complete implementation for now.
AccessSensorService classReal implementation of getDataFromSensor. Because of some technical reasons, we cannot provide a complete implementation for now.
mock_impl packageAbstractAccessBorderRouterService classThis abstract class defines the basic operations to communicate with border routers. Also provide some common methods. To use this class, one need to extend this abstract class and implement abstract methods: getSensorIpByBorderRouterIp() and existBorderRouter().
AbstractAccessSensorService classThis abstract class defines the basic operations to communicate with sensors. Also provides some common methods for storing sensor or data into database. To use this class, one need to extend this abstract class first, and implement getDataFromSensor() method.
DataFetchingAndMappingService classThis is the service layer class that fetches data from repositories.
PropertyService classThis class contains methods to save and get properties of the application. These properties are stored in database.
taskScheduler packageindex.jsp pageThe welcome page of the project, shows some basic information and introduction, also provides the entrance to the whole system.
set_data_type.jsp pageIn this page, user can enter the data types that he/she want our system to monitor. Notice that the data types must be supported by sensors.
set_border_router.jsp pageIn this page, user can enter the IPv6 address of each border router in the sensor network.
set_sensor_name.jsp pageIn this page, user can set a name for each sensor IP. These sensor IP addresses are fetched from border router by our back-end server.
monitor_data.jsp pageVisualize data in this page, using Chart.js to draw bar charts and line charts.
error_page.jsp, general_error_page.jsp pageDisplay error message, including server internal error exception stack trace and front-end error trace.
Below is the runtime environment we use to develop and test the whole system. More detailed runtime environment information can be found in Maven configuration file “pom.xml”.
First you need to clone the whole repository to your computer. To clone the repository, go to the directory you want to save the project, type the following command in your terminal:
cd ${replace with the directory you want to save this repository}git clone git@github.com:Will-GXZ/House-Monitor-Sensor-Network-System.git
House Monitor is a Maven project, to build the project you need to have Maven installed on your computer first. To install Maven, you can follow the Official Maven Installation Guide.
If you are using macOS, you can use Homebrew by typing the following command in your terminal:
brew install maven
This project is designed to be deployed to Tomcat, if you don’t have Tomcat installed in your machine, you need to install it first. Please refer to Tomcat Official Setup Guide.
If you are using macOS, you can use Homebrew by typing the following command in your terminal:
brew install tomcat
Refer to the Official MySQL Installation Guide, follow the instruction to install MySQL on your computer. If you already have your MySQL installed, you can skip this step.
It is highly recommended for you to install MySQL Workbench. This tool gives visual database administration and data management.
persistence-mysql.propertiesThe next step you need to do is to edit src/main/resources/persistence-mysql.properties file, change the values of jdbc.url, jdbc.user and jdbc.pass according to the MySQL configuration on your computer.
Since this is a maven project, it is easy to solve complicated package dependency problem. Make sure you have maven installed in your machine, go to the root directory of the repository you just cloned, open your terminal, type in the following command:
cd ${replace with your root directory of the repository}mvn clean install
This command will automatically build and store the result artifact into the ./target folder
Now let’s deploy the project at localhost:8080/house/house_monitor.
First, go to the target directory, copy the ./house_monitor.war file to your $CATALINA_HOME/webapps directory.
Then, type in the following command in your terminal:
catalina run
There are also other ways to deploy, see This turorial for more information.
If everything is good, now you have successfully deployed the project in Tomcat. Now just open your browser, go to url: localhost:8080/house/house_monitor, and enjoy our House Monitor.
This page is the entrance of the whole system. To start, you need to click “GET STARTED“ or “CONTINUE“ button. If it is your first time to use our system, you have to click “GET STARTED“.
Below is the screenshot of our index page:

After clicking “GET STARTED“, you will be redirected to this page. In this page you need to enter the types of data that you want from sensors. Follow the instruction on the page, then click “Submit“ or “Skip“ after you finished.
The picture below is the screenshot of data type setting page:

The next step is to enter the IP addresses of border routers in your sensor network. It is required for you to set a name for each border router. Follow the instruction on the page, click “Submit“ after you finished.

After you entered border router IP addresses, our server will automatically find all sensors that connected to each border router. The next step is to set a name for each sensor. This step is optional, follow the instruction on the page, click “Submit“ or “Skip“ after you finished.

If you get this page, that means you have finished the setting process.
On this page, two forms of data are displayed. One is the current data displayed in bar charts, the other one is the history data that is displayed in line charts. Click “Show Current Data“ and “Show History Data“ in the top bar to switch between these two modes.
The left side bar contains a list of border router name, click one of them to select whose sensor data you want to see.
The button “Auto Data Fetching Disabled/Enabled“ toggles the auto data fetching function. Before check history data, you should enable auto data fetching to store data into database.
The last button is “Clear History Data“, click this button to delete all sensor data entries in database.
Below is the screenshots of data monitor page:
(current data bar chart)
(toggle auto data fetching, set period interval)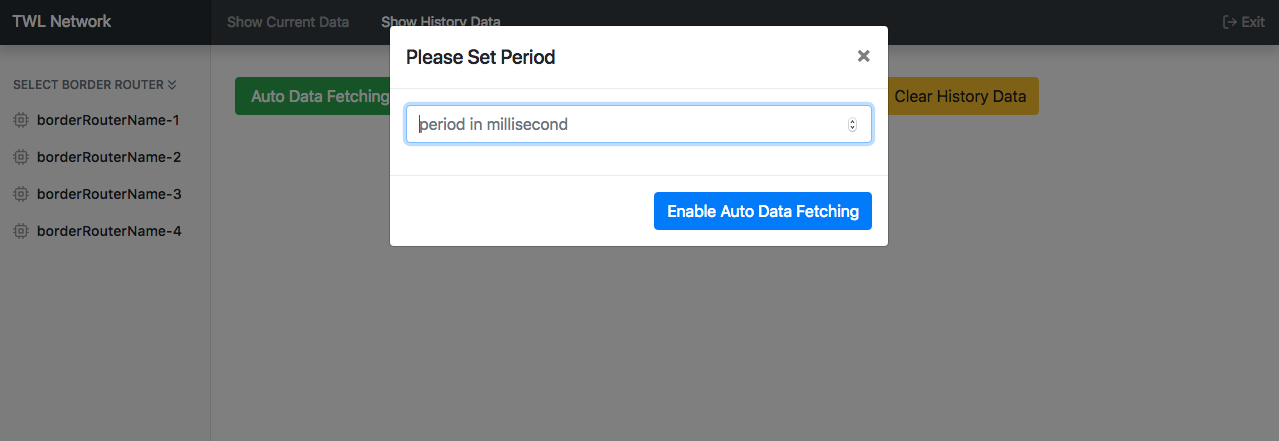
(history data line chart)