An R package for getting academic projects/papers started.
{steveproj} is an R package to help you start and manage R projects
with an eye toward producing an academic project (to culminate in an
academic paper). The package is in development and will incorporate
other packages in my eponymous R ecosystem, prominently{stevetemplates}. The
package itself leans primarily on Rstudio and how it creates/manages
projects. The creation a project in Rstudio, through {steveproj}, will
result in a new directory containing subdirectories for rendering
documents (src/), R scripts for analysis (R/), finished data objects
(data/), and finished reports (doc/). An accompanying Makefile and
R Markdown file will assist in the management and production of the
project.
Assuming the latest/development version of{stevetemplates}
(i.e. the one that has the Word template) and considering any potential
LaTeX weirdness that comes from different builds, this package has
function in R and Make that will:
R/ directory and render to thedata/ directory.refs.bib fileinst/ directory. You can tweak this if you like.render_abstract.R in the src/ directory is the companion scriptrender_pdf-anon.R in the same directory.When the time comes, you can install this on CRAN. Any version of this
package on CRAN should be understood as a “stable” release that may lag
behind the “development” versions available on Github. However, releases
on CRAN should come with more confidence about quality control.
install.packages("steveproj")
A developmental version version of {steveproj} is available on Github
and you can install it via the {devtools} package. I suppose using the{remotes} package would work as well.
devtools::install_github("svmiller/steveproj")
The functions in this package work as intended in an R console, but this
package realizes its full potential and its core functions are fully
augmented through three additional pieces of software the user should
already have installed. The first is Rstudio.
Most dedicated R users are likely fully aware of Rstudio as an
integrated desktop environment (IDE) and already have it installed and
pre-configured to what they think is ideal for their workflow. I will
only add that I think it advantageous for the sake of this package to
adjust the pane layout such that the “source” pane is top left, the
“console” pane is top right, the “environment” pane is bottom left, and
the “files” pane is bottom right.
The second piece of software is LaTeX.
LaTeX is a prominent document preparation system in academia and
preferred by publishers especially for its contrast to “What You See Is
What You Get” word processors like Microsoft Word. {steveproj}
ultimately places R Markdown and Pandoc—which are necessary for this
package—before LaTeX in terms of document preparation. No matter,{steveproj} necessarily elevates LaTeX PDF documents above other
output types.
There are two options for installing LaTeX on your system. First, you
can install it yourself—in all its 4+ gigabytes of glory. For Mac users,
this is “MacTeX” and you can install it
here. For Windows users, this is “MikTeX”
and you can install it here. For (Ubuntu) Linux
users, something likesudo apt-get install texlive-base texlive-latex-base texlive-latex-extra
should work. Linux users are probably aware that whatever version of
LaTeX comes default in their package manager of choice comes with
multiple, complementary packages. Installing even texlive-base will
probably install more of them as dependencies.
The second option is tailored for those interested users with no
awareness of LaTeX. {steveproj} imports {rmarkdown}, which in turn
imports {tinytex}. This would be an R package to install and maintain
a version of LaTeX to compile these documents that ostensibly precludes
the need to download the more comprehensive suites available on the
internet as proper LaTeX distributions for different operating systems.
Once {tinytex} is installed as an R package, this simple function will
install a working version of LaTeX.
tinytex::install_tinytex()
I will only add that users who do this should know the preferred flavor
of LaTeX template (from {stevetemplates}) in this package requires one
additional LaTeX dependency that {tinytex} does not install by
default. You may encounter a vague error in rendering to PDF that reads
something like this.
! Undefined control sequence. l.40 {same} % disable monospaced font
for URLs
If you encounter this error, run the following command in your R
console.
tinytex::tlmgr_install("xurl")
This should fix
it. I thank Ian
Adams for bringing this to my attention (and Cornelius Hennch for
proposing a solution).
The third piece of software the user should install is
Make). Make is a build
automation tool built around a “Makefile”, which contains a set of
recipes that have various targets and dependencies. For each target, if
the specified dependency is “newer” than the target (or if the target
does not yet exist), the Makefile executes a command. Users will get a
reproducible example of how this works, and they can learn by example
from it, but it assumes the user already has it installed.
Installation of Make prior to installation of {steveproj} is not
necessary; in fact, it’s not even strictly necessary to have Make
installed at all. It is, however, strongly encouraged. Linux users and
Mac users should, in theory, have Make installed on their operating
systems already (i.e. because both are UNIX-derivative and Make is a GNU
program). Opening a terminal and entering the following command should
confirm that.
make -v
If the console output instead suggests Make is not installed, the user
may want to search for how they can install it (given their particular
flavor of Mac or Linux). For Mac users, most paths would lead to
installing or updating Xcode from the App
Store
though the popular Homebrew package manager should
also do this. Linux users in the Debian family (prominently: Ubuntu)
who, for some reason, don’t already have this installed can install it
via sudo apt-get install build-essential orsudo apt-get -y install make in a console. Linux users in the Red Hat
family (prominently: Fedora) should be able to install it by way ofsudo yum install yum-utils or dnf install @development-tools.
However, it seems impossible that these would not already be installed
on most Linux distributions these days (and for Mac as well). It is one
of the oldest and still most widely used GNU programs. No matter,make -v should confirm its presence after one of these installation
paths.
Windows users will invariably have to install it since it will not come
by default. The Carpentries has a
guide and installer to
do this. Windows users may also want to consider installingChocolately, an apparent Homebrew analog
for Windows users. Afterward, a simple choco install make command
should work just fine. The increased integration of Linux into Windows,
prominently Windows Subsystem for
Linux,
offers more avenues for Windows users to install Make on their operating
system. I thank Dave Braze for alerting
me to another option. Windows users can install and configure make
through installing {RTools}. Afterwards, the user can add a fully
qualified path to their PATH environment. You can read more about this
process here.
My website will have a more exhaustive tutorial for using this package
and all that comes in it. For now, a user maximize their experience with{steveproj} through either the console or Rstudio.
Assume the current working directory is something like/home/steve/Dropbox/projects (as it is for me). Then, a user can
create a new project with the create_project() command.
steveproj::create_project("dissertation")
This will create a new directory in the working directory, titled
“dissertation”, that includes a skeleton of a research project to assist
the user in getting started on their academic paper/project. That
directory will be located in the current working directory. The only
downside to the console approach over the Rstudio approach is the
console approach won’t create an .Rproj file in the directory. The
Rstudio approach will do this. The choice is yours whether you want
this, but .Rproj files are wonderful for keeping environments insular
in Rstudio.
You could optionally combine this command line call in the console with
the following command, which will add an .Rproj file to the directory
you just created.
# steveproj::create_project("dissertation")# ^ assume you just ran this# Then, do this nextsteveproj::create_rproj("dissertation")
Go to File > New Project. You’ll see a prompt that looks like this.
Select “New Directory”.
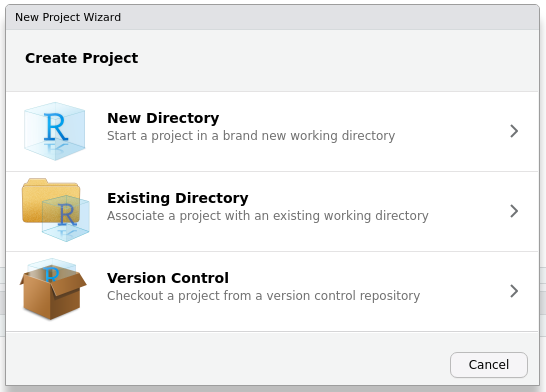
That will direct you here. Scroll down your available project types
until you see my “S” icon, which is incidentally the favicon on my
website. Select that entry to create a new
academic paper/project.
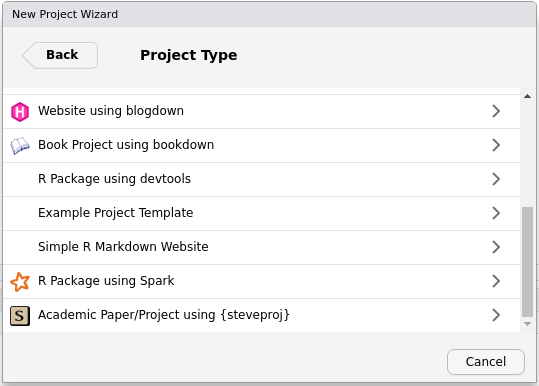
That will direct you here. Enter the name of the directory you want to
create. Click “Create Project” when you’re done. This will create a new
directory, titled whatever you entered in the directory name, along with
an .Rproj file. By default, it will also open a new Rstudio session.

{steveproj}The March 15, 2021 post on my
blog
talks more about the design here. Obviously, the skeleton project
created in {steveproj} is full of gibberish text and an analysis that
is likely uninteresting to the user. No matter, the skeleton project
points to the possibilities of {steveproj} and suggests a template to
copy for your own workflow.
The Makefile and ms.Rmd files are executable as they are (assuming,
obviously, that you installed Make). In Rstudio, switch from the console
tab to the terminal tab. Therein, enter the following command (provided
the working directory in the terminal is the same as the location ofMakefile).
make all
This will run the analyses and compile the results of the analyses into
a PDF document, an anonymized PDF document, an anonymized Word document,
and an HTML document. It will also generate an title page with abstract.
All of those files will be in the doc/ directory.
If the user is interested in generating a .bib file for their
citations, they can execute the following command.
make refs
This will farm the ms.Rmd file for citations and format that as arefs.bib file in the inst/ directory.